In my previous post about Claude Code, I talked about using VS Code devcontainers to safely run Claude in “dangerous mode.” That was great for a typical software project. But what about something harder? What about porting a complex hardware-interfacing library from Python to Go, where you need to deeply understand USB protocols, radio registers, and firmware internals?
That’s exactly what I did with gocat – a Go library for controlling the YardStick One sub-GHz RF transceiver. And Claude Code was instrumental in making it happen.
The Challenge: Porting RFCat to Go
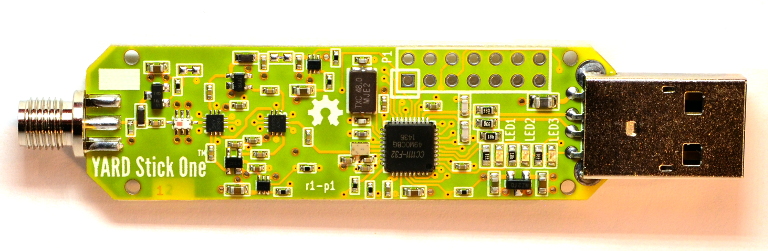
The YardStick One (YS1) is a fantastic piece of hardware for RF research. It’s based on a CC1111 radio transceiver that can transmit and receive on frequencies from 300-928 MHz. The existing tooling is RFCat, a Python library that’s been around for years and works well.
But Python has its limitations for production deployments. Managing Python environments across systems is a pain. The GIL limits concurrency. And shipping a Python application means shipping a runtime. Go, on the other hand, compiles to a single static binary. No dependencies. No virtualenvs. Just run it.
The problem? Porting RFCat to Go meant understanding:
- The USB protocol between host and device
- The CC1111 radio register configuration
- TX/RX state machine transitions
- The RFCat firmware internals
This isn’t a “read the API docs and write some wrapper code” kind of project. This is reverse engineering.
A Safe Space for Dangerous Work
After my experience with devcontainers, I knew I wanted something more flexible for hardware work. The YardStick One needs USB access, which means device passthrough. And I wanted to be able to reference the original RFCat Python code while writing the Go replacement – but I definitely didn’t want Claude accidentally modifying that code.
Enter localdev.
localdev is a Podman container setup I built specifically for this kind of work. The key insight: mount directories with different permissions for different purposes.
Here’s what my gocat development environment looked like:
Container Filesystem
├── /gocat/                 # My project (read-write)
├── /claude/                # Global Claude config (read-write)
└── /external/
    └── rfcat/              # Original RFCat source (READ-ONLY!)
The rfcat folder was mounted read-only. Claude could read every line of Python code, every C firmware source file, every protocol comment. But it couldn’t change a single byte. If Claude went nuts and tried to “improve” the original code, the mount permissions would just say no.
This is the beauty of container isolation done right. You’re not just limiting what directories Claude can see – you’re controlling what it can do with them. Read-only mounts for reference material. Read-write for your actual work. And the container boundary keeps everything else safe.
Building Understanding Before Building Code
Here’s where my approach differed from typical “vibe coding.” I didn’t just point Claude at the RFCat source and say “port this to Go.” That would have been a disaster. Instead, we started with documentation.
Deep Diving the Datasheets
The first step was understanding the hardware itself. The CC1111 is a complex chip – it’s got an 8051 microcontroller core, a full RF transceiver, USB 2.0 support, and dozens of configuration registers. Texas Instruments publishes a comprehensive datasheet, but it’s 280+ pages of dense technical material.
Claude and I worked through it together. We documented the key register addresses, the configuration formulas, the state machine behavior. We built up docs/cc1110-cc1111.md with a quick reference:
- Device specifications (frequency bands, data rates, power levels)
- Register overview (SYNC1/0, FREQ2/1/0, MDMCFG, PA_TABLE…)
- Command strobes (SFSTXON, SCAL, SRX, STX, SIDLE)
- Configuration formulas for frequency, data rate, channel bandwidth
Reverse Engineering the USB Protocol
Next came the USB protocol. RFCat uses bulk transfers on Endpoint 5 for the primary command/response protocol. The format isn’t documented anywhere except in the source code comments and the implementation itself.
Claude read through rflib/chipcon_usb.py and rflib/chipcon_nic.py while I asked questions. We documented everything in docs/rfcat-packet-format.md:
- Packet structure (app ID, command byte, length, payload)
- Response format (the ‘@’ marker, echoed app/cmd, response data)
- Application IDs (APP_SYSTEM for admin commands, APP_NIC for radio operations)
- Every command and its payload format
This document ended up being over 900 lines. It’s essentially a complete protocol specification reverse-engineered from the source.
Understanding TX/RX State Machines
The trickiest part was understanding how transmit and receive actually work. The CC1111 has a state machine (MARCSTATE) that transitions between IDLE, RX, TX, and various calibration states. Getting the sequencing wrong means packets don’t go out, or received data gets corrupted, or the radio just hangs.
We built docs/recv-and-xmit.md covering:
- Prerequisites for RF operations
- Step-by-step receive mode configuration
- Step-by-step transmit mode configuration
- The firmware’s interrupt-driven receive process
- Error handling and recovery
USB from Go
Since this was a Go project, we also documented how USB device access works with the gousb library. Control transfers, bulk transfers, endpoint handling, error conditions. This became docs/usb-from-go.md.
Default Configuration Analysis
Finally, we documented all the default register values that RFCat uses. What frequency? What modulation? What data rate? What sync word? All captured in docs/defaults-in-rfcat.md with detailed breakdowns of every register field.
Then We Started Coding
Only after we had comprehensive documentation did we start writing Go code. And at this point, the coding was almost mechanical. We knew exactly what USB commands to send. We knew exactly what register values to write. We knew what responses to expect.
The implementation happened incrementally:
- USB device enumeration – find and open YardStick One devices
- Basic protocol – send commands, receive responses, handle the ‘@’ packet framing
- Register access – peek/poke memory, read/write radio configuration
- Radio mode control – transitions between IDLE, RX, TX states
- Configuration management – load settings from JSON files
- Packet operations – actually transmit and receive RF data
- YS1 amplifier control – enable the front-end amps for better range
Each piece built on the documentation we’d already created. When something didn’t work, we could go back to the docs, compare against the RFCat behavior, and figure out what we’d missed.
The Payoff: Real RF Communication
The final validation came with the test-10-repeat tool. With two YardStick One devices connected, it runs a reliability test – sending packets at increasing speeds and measuring how many get through.
Here’s an actual test run:
========================================
SUMMARY
========================================
Delay           Sent     Recv     Success%   Avg RSSI
------------------------------------------------------------
1s              10       10       100.0      -139
500ms           10       10       100.0      -140
250ms           10       10       100.0      -137
125ms           10       10       100.0      -139
62.5ms          10       10       100.0      -140
31.25ms         10       10       100.0      -138
15.625ms        10       10       100.0      -140
100% packet success rate at 64 packets per second. The Go implementation works. It’s not a toy – it’s actually communicating over RF, using the same firmware and protocol as RFCat, but from native Go code.
What Made This Work
Looking back, several things made this project successful:
Documentation First: We didn’t try to port code line-by-line. We extracted understanding from the original codebase and captured it in documentation. This made the actual implementation much cleaner because we could design for Go idioms instead of translating Python patterns.
Read-Only Source Reference: Having the RFCat source available read-only meant Claude could always go check “how does the original handle this?” without any risk of contaminating that reference material.
Container Isolation with USB Passthrough: localdev’s Podman setup includes USB device passthrough (--device /dev/bus/usb). So we got full isolation for file operations while still being able to talk to actual hardware.
Incremental Building and Testing: We built tools along the way to validate each piece. lsys1 to list devices. ys1-dump-config to read current settings. send-recv for basic TX/RX. Each tool proved that the underlying library code worked before we built on top of it.
Claude’s Pattern Recognition: Honestly, Claude is really good at seeing patterns in code. It could look at the Python RFCat implementation and understand not just what it did but why. That made the translation to Go much more than a mechanical exercise.
Conclusion
This project convinced me that Claude Code is genuinely useful for porting work – not just writing new code, but understanding existing codebases and reimplementing them in different languages.
The key is preparation. You can’t just throw Claude at a complex codebase and expect miracles. But if you set up a safe environment with appropriate permissions, take the time to build documentation, and work incrementally… you can accomplish a lot.
gocat isn’t done. It’s still experimental, missing features, needs more testing. But the core works. Two YardStick Ones can talk to each other through Go code, using the same RF protocol as the battle-tested Python original.
That’s not bad for an AI-assisted porting project.
If you want to try it yourself, both gocat and localdev are available on GitHub. And if you’re doing hardware work with Claude Code, I strongly recommend the container isolation approach. Let Claude run wild – just make sure “wild” is a very carefully bounded sandbox.